In the world of sourcing, offering the same product as everyone else is a race to the bottom.
Your customers—whether they are hardware retailers, property managers, or real estate developers—want solutions that fit their specific needs. They want products that reflect their brand. They want to offer something their own customers cannot find at the big-box store down the street. This is where OEMs become a competitive advantage.
By partnering with a manufacturer who offers comprehensive OEM capabilities, you can transform a standard parcel drop box into a product that is uniquely yours—or uniquely your client's.
What Can Be Customized? A Complete OEM Menu
As a parcel delivery box manufacturer with extensive customization experience, Dongzhixin can customize almost every aspect of its products.
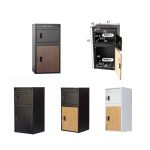
1. Dimensions: Size Matters
Standard parcel drop boxes come in common sizes. But your clients may need something different.
| Customization | Examples |
|---|---|
| Width | Narrow boxes for tight spaces, extra-wide for large packages |
| Depth | Shallow boxes for wall mounting, deep boxes for bulk deliveries |
| Height | Tall boxes for standing packages, low-profile for visual appeal |
| Shape | Square, rectangular, or custom proportions |
Why It Matters: A property developer with 200 units needs boxes that fit uniform wall niches. A rural homeowner needs a box large enough for weekly package accumulation. Standard sizes do not always work.
2. Steel Gauge and Construction
Different applications demand different levels of durability.
| Gauge | Application | Customization Options |
|---|---|---|
| 1.0mm–1.2mm | Light residential | Standard for budget lines |
| 1.2mm–1.5mm | Standard residential, light commercial | Most common commercial grade |
| 1.5mm–2.0mm | Heavy-duty commercial, high-theft areas | Premium line, institutional use |
| 2.0mm+ | Extreme security, government | Specialty applications |
Reinforcement Options:
- Double-walled doors
- Reinforced corners
- Extra bracing on mounting points
- Anti-pry edges
3. Color and Finish
Color customization is one of the most visible—and most requested—OEM options.
| Option | Details |
|---|---|
| Standard colors | Black, white, gray, brown, green |
| Custom colors | Any RAL or Pantone color match |
| Finish texture | Gloss, semi-gloss, matte |
| Special coatings | Anti-graffiti, anti-bacterial, marine-grade (coastal) |
4. Branding and Logos
Make the product unmistakably yours or your client's.
| Method | Description | Best For |
|---|---|---|
| Laser-cut logo | Logo cut directly into steel (headboard, door) | Premium, permanent branding |
| Embossed metal tag | Raised logo on metal plate, riveted to box | Durable, professional |
| Screen printing | Logo printed onto surface | Cost-effective, clear visibility |
| Vinyl decal | Adhesive logo applied after finishing | Low MOQ, easily changed |
| Powder coating mask | Logo revealed through contrasting finish | High-end, seamless look |
Placement Options:
- Front door (centered or corner)
- Above drop door
- Side panels
- Back plate
- Packaging only
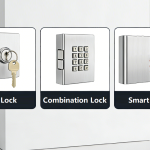
5. Locking Mechanism
Lock customization allows you to serve different security needs and user preferences.
| Lock Type | Customization Options |
|---|---|
| Key lock | Keyed alike (multiple boxes same key), master key systems, high-security cylinders |
| Combination lock | Custom code length, scramble technology, weather-rated keypads |
| Smart lock | Custom app branding, integration with property management software, specific connectivity (Bluetooth/Wi-Fi/cellular) |
| Dual lock | Multiple lock types on same box |
For Property Managers: Keyed alike systems allow one master key to open all boxes in a community, simplifying maintenance.
For Vacation Rentals: Smart locks with temporary code generation are essential. OEM manufacturers can integrate with specific platforms or provide white-label apps.
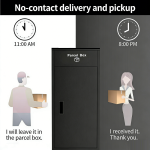
6. Drop Door Configuration
The delivery slot is a critical design element that can be customized.
| Option | Description |
|---|---|
| Standard drop door | One-way hinged door, top or front opening |
| Drop chute | Angled chute for easier package insertion |
| Anti-fish design | Internal baffle prevents retrieval through drop door |
| Security slot | Narrow slot that accepts only packages, not hands |
| Automated door | Motorized opening for smart integration |
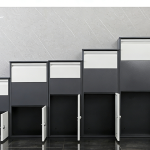
7. Mounting System
Different installations require different mounting approaches.
| Mounting Type | Customization |
|---|---|
| Wall-mount | Custom bolt pattern, concealed mounting, tamper-proof hardware |
| Post-mount | Custom post height, integrated post sleeve, anchor system |
| Freestanding | Weighted base, ground anchors, leveling feet |
| Recessed | Flush-mount design for wall recesses |
| Modular | Stackable or side-mountable for multi-box installations |
8. Packaging
Your brand experience extends to the box the product arrives in.
| Customization | Options |
|---|---|
| Retail packaging | Branded cartons with product images and features |
| Bulk packaging | Plain cartons with custom shipping marks |
| Insert materials | Custom foam or cardboard inserts for protection |
| Instructions | Custom assembly guides with your branding |
| Pallet labeling | Custom pallet tags for warehouse identification |
The OEM Process: From Concept to Container
Understanding the OEM process helps you plan timelines, manage client expectations, and ensure a smooth production run. Here is how a typical custom parcel box project unfolds.
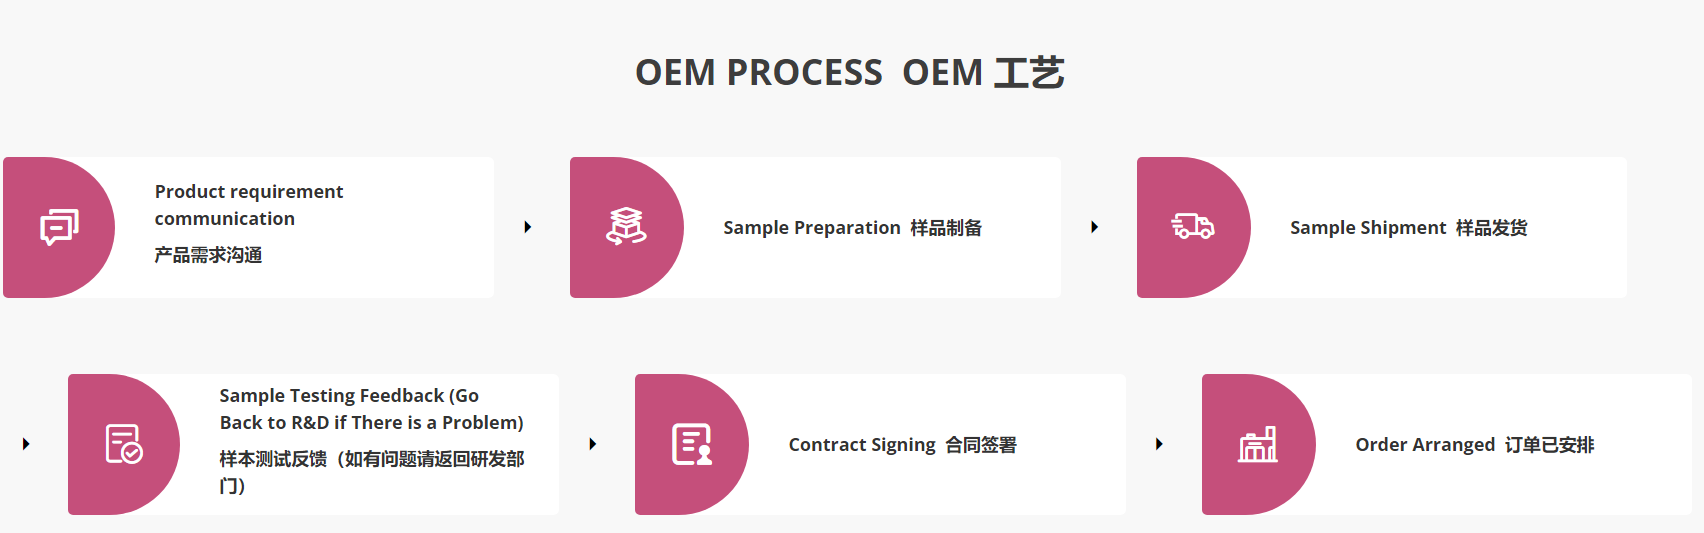
Step 1: Product Requirement Communication
What Happens:
You share your vision with the manufacturer. This is the foundation of the entire project.
What to Provide:
- Reference images, sketches, or CAD drawings
- Technical specifications: dimensions, steel gauge, lock type, finish requirements
- Branding requirements: logo placement, method (laser-cut, screen print, embossed)
- Quantity estimates (initial order and potential future orders)
- Target price points
- Desired timeline
- Any special requirements (weatherproofing, specific certifications, etc.)
What You Receive:
- Initial feasibility assessment
- Preliminary quotation
- Rough timeline estimate
- Questions to clarify any ambiguous requirements
Pro Tip: The more detail you provide upfront, the fewer surprises later. If possible, send a physical sample or photos of a similar product to illustrate your vision.
Step 2: Sample Preparation
What Happens:
Once requirements are confirmed, the manufacturer begins preparing samples. This is where your concept becomes a physical product.
The Process:
| Stage | Timeline | Description |
|---|---|---|
| Engineering drawings | 3–7 days | Technical drawings created for your approval |
| Drawings approval | 1–3 days | You review and sign off on specifications |
| Tooling (if needed) | 5–15 days | Custom molds or tooling are created |
| Material procurement | 3–10 days | Steel, locks, hardware, and coatings are sourced |
| Sample production | 10–20 days | 1–3 physical samples are manufactured |
What You Receive:
- Engineering drawings for approval
- Physical sample(s) for evaluation
Pro Tip: Request at least two samples—one for testing and one to keep as your reference “golden sample” for future quality comparisons.
Step 3: Sample Shipment
What Happens:
The finished sample is packed and shipped to you for evaluation.
Logistics Considerations:
| Factor | Details |
|---|---|
| Shipping method | Express courier (DHL, FedEx, UPS) for fastest delivery |
| Transit time | 3–7 days depending on location |
| Cost | Typically borne by buyer; sometimes refundable with bulk order |
| Documentation | Commercial invoice, packing list, shipping label |
What You Receive:
- Physical sample(s) delivered to your door
- Shipping tracking information
Pro Tip: Inspect the sample immediately upon receipt. Check for damage during transit before evaluating quality.
Step 4: Sample Testing Feedback (Go Back to R&D if There Is a Problem)
What Happens:
You evaluate the sample against your requirements and provide feedback to the manufacturer.
Evaluation Checklist:
| Item | What to Check |
|---|---|
| Dimensions | Measure against specifications |
| Steel gauge | Verify with caliper |
| Finish | Color match, coating uniformity, edge coverage |
| Welds | Smooth, continuous, no gaps |
| Lock function | Smooth operation, correct key/code function |
| Door alignment | Opens and closes properly, seal contact |
| Branding | Placement, clarity, method (laser, print, etc.) |
| Assembly | If applicable, test assembly process |
Possible Outcomes:
| Outcome | Action |
|---|---|
| Sample approved | Proceed to Step 5 |
| Minor adjustments needed | R&D makes corrections; revised sample produced (3–7 days) |
| Major issues | Return to R&D for redesign; new sample timeline negotiated |
What You Provide:
- Written feedback (photos of issues are helpful)
- Approval confirmation or revision requests
Pro Tip: Be thorough in your evaluation. Approving a sample with hidden flaws means those flaws will appear in the entire production run. Take your time and test everything.
Step 5: Contract Signing
What Happens:
Once the sample is approved, formal agreements are put in place.
Documents to Review:
| Document | What It Covers |
|---|---|
| Purchase Order (PO) | Quantities, unit price, total value |
| Production Contract | Specifications, quality standards, delivery terms |
| Tooling Agreement | If applicable, ownership and exclusivity of custom molds |
| Payment Terms | Deposit amount, balance payment schedule |
| Lead Time | Confirmed production and shipping dates |
| Warranty | Coverage terms for defects |
Payment Structure (Typical):
| Payment | Percentage | Timing |
|---|---|---|
| Deposit | 30–50% | Upon contract signing |
| Balance | 50–70% | Before shipment (or against Bill of Lading) |
What You Receive:
- Signed contract
- Confirmed production schedule
- Payment instructions
Pro Tip: For larger orders, consider negotiating a letter of credit (L/C) or payment against shipping documents to protect your cash flow.
Step 6: Order Arranged
What Happens:
Production begins and proceeds according to the agreed schedule. The manufacturer manages the manufacturing process while keeping you informed.
Production Phases:
| Phase | Timeline | Key Activities |
|---|---|---|
| Raw material preparation | 3–10 days | Steel coils, hardware, packaging materials ordered and inspected |
| Fabrication | 10–20 days | Cutting, bending, welding, drilling |
| Surface treatment | 2–5 days | Degreasing, phosphating, powder coating, curing |
| Assembly | 3–7 days | Hardware installation, lock fitting, final assembly |
| Quality control | 2–5 days | In-process inspections, final function testing |
| Packaging | 2–4 days | Boxed, palletized, labeled |
Communication During Production:
- Weekly progress updates
- Photos or videos of production stages (upon request)
- Notification of any delays or issues immediately
- Pre-shipment inspection scheduling
Pre-Shipment Inspection:
| Option | Description |
|---|---|
| In-house QC | Factory quality team performs final inspection; report provided |
| Third-party inspection | Independent agency (SGS, Bureau Veritas, etc.) inspects before loading |
| Buyer inspection | You or your representative visits factory to inspect |
What You Receive:
- Completed order
- Inspection report
- Shipping documentation
- Tracking information
Pro Tip: Even if you trust the manufacturer, consider a third-party inspection for first-time orders or high-value shipments. It is a small cost that prevents major surprises.
Minimum Order Quantities (MOQs) for OEM
Customization requires setup time. Manufacturers need to spread these costs across enough units to make the project viable.
| Customization Level | Typical MOQ |
|---|---|
| Color/finish change only | 50–100 units |
| Standard size with custom color/branding | 100–200 units |
| Dimension changes (within reason) | 200–300 units |
| Major structural redesign | 300–500 units |
| New tooling/molds required | 500–1,000+ units |
Note: MOQs vary by manufacturer. Some factories specialize in low-MOQ customization; others are set up for high-volume production.
Cost Implications of Customization
Understanding the cost structure helps you price your custom products appropriately.
One-Time Costs
| Cost Type | Typical Range | Notes |
|---|---|---|
| Tooling/mold fees | $500–$5,000+ | Required for new shapes or components |
| Sample costs | $100–$500 per sample | Often refundable with bulk order |
| Color matching | $200–$800 | For custom RAL/Pantone colors |
| Branding setup | $100–$500 | Screen printing screens, laser program |
Per-Unit Cost Drivers
| Factor | Impact on Cost |
|---|---|
| Thicker steel | +10–30% |
| Custom color | +5–15% |
| Smart lock | +$20–$80 |
| High-security lock | +$10–$30 |
| Custom packaging | +$2–$10 per unit |
| Complex assembly | +5–20% labor |
Pricing Strategy
| Product Tier | Typical Wholesale Price | Recommended Retail Markup |
|---|---|---|
| Standard (off-the-shelf) | $80–$150 | 40–50% |
| Basic custom (color/branding) | $100–$200 | 50–60% |
| Full custom (dimensions + branding) | $150–$300 | 60–80% |
| Premium custom (smart lock + full specs) | $250–$500+ | 80–100%+ |
The Bottom Line
In a growing market, customization is an important competitive edge. With OEM parcel drop boxes, you give your clients products that fit their exact needs, reflect their brand, and aren't available elsewhere. You build long-term relationships that competitors cannot easily disrupt.
Contact us today to discuss your OEM parcel drop box project. From custom colors and branding to unique dimensions and smart lock integration, we bring your vision to life. Share your specifications, and we will provide engineering drawings, samples, and volume pricing.